
Grannie Patches Border Tutorial

★☆☆ - Beginner
Crochet Terms:
This pattern is written in UK terms.
American terms are given below in green.
British (American)
sp - Space
ss - Slip Stitch (Slip Stitch)
ch - Chain (Chain)
dc - Double (Single)
htr - Half Treble (Half Double)
tr - Treble (Double)
dtr - Double Treble (Treble)
Pattern Download
This blanket is now available as a downloadable PDF
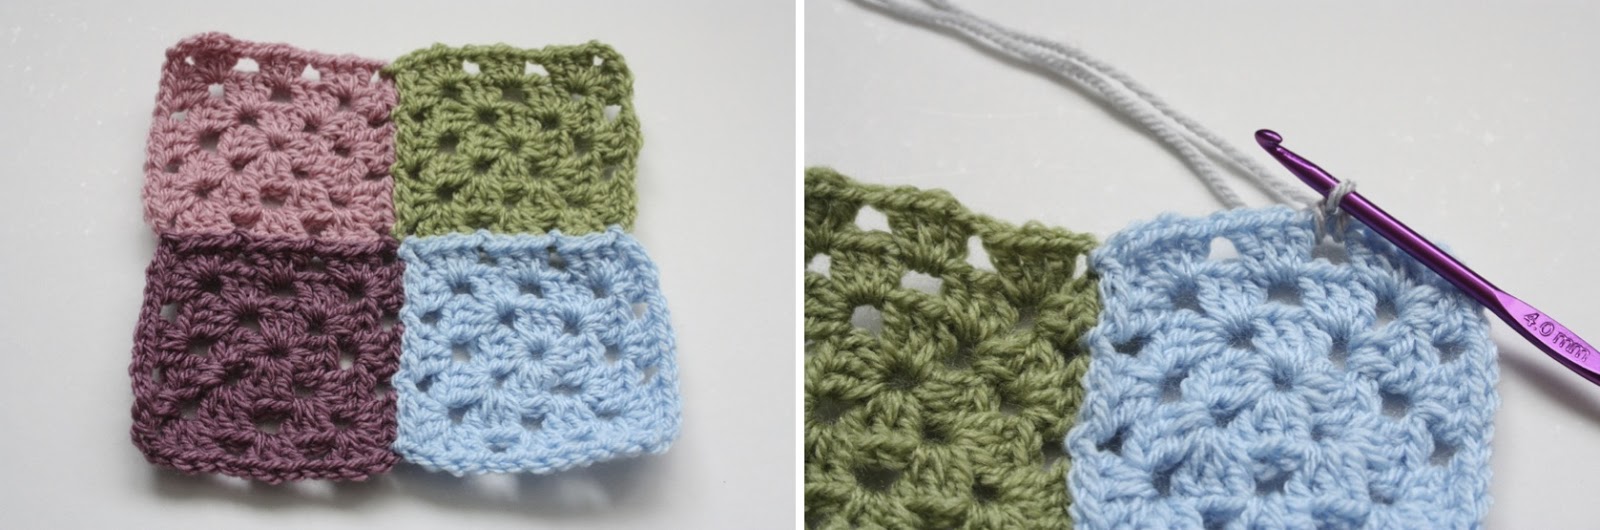
You can use this border pattern on any blanket which uses traditional granny squares, or even a large granny blanket. For this little tutorial I made up a teeny tiny sample of my Giant Grannie Patches blanket.
ROUND ONE
Attach new yarn colour to any of the chain spaces along the side of the blanket and chain 1.

Make a chain of 3.

Then make a double crochet into the next chain space along the blanket.
Carry on in the same way, making a chain of 3 and then a double crochet into the next chain space. Until you reach a place where two squares are joined together.

To do this, put your hook into the first space, wrap yarn around the hook and pull through.
Then, put your hook into the second space, wrap yarn around the hook and pull through. (Three loops on hook.)

Carry on chaining 3 and making double crochets (dc's) into the chain spaces, until you reach the corner space.

Chain 3 and make a dc into the corner space.
Then chain 2.

Then make a second dc into the corner space, to complete the corner.
Then carry on chaining 3, making a dc into each ch space, and making a decreasing dc into the place where two squares meet, and working the corners as described above.

Keep going until you get right around to the beginning of the blanket, then chain 3.
Make a slip stitch into the top of the 1st double crochet of the round.

Keep the same colour yarn and chain 1.
Make 3 dc's into the loop. (Make by the 3 chains between each dc of the last round)

Carry on making 3 dc's into each chain loop along the side of the blanket.
Until you get to the corner.

Make 1 dc into the corner loop and then chain 2.
Make a second dc into the same chain loop to complete the corner.

Work your way right round the blanket, working the sides and corners as described, until you get back to the beginning.

ROUND THREE
Keep the same colour yarn, chain 1 and make a dc into the same space.

Make a dc into each stitch along the edge of the blanket until you get to the corner space.
Make a dc into the chain space and then chain 2.

Work each corner as described above and when you reach the beginning of the blanket, make a slip stitch into the 1st dc to complete the round.

ROUND FOUR
Attach a new colour yarn. Make sure you attach it in line with one of the dc's of ROUND ONE. (see pic)

Chain 2.

This should mean that your next dc is also in line with the dc of ROUND ONE. See the picture on the top right: I've put my hook in to show where the next dc is going to go. 2 dc's of ROUND THREE have been skipped, and the hook is in the 3rd chain, which is also inline with the dc of ROUND ONE (a decreasing dc in this case)

Make a dc into the corner space and then chain 2.

Make a second dc into the corner space, then carry on chaining 2 and making dc's as described above.
Work your way right around the blanket and finnish by chaining 2 and making a slip stitch into the 1st dc of the round.

ROUND FIVE
Attach a new colour yarn into one of the chain loops and chain 3 (This counts as a tr).
Then make 2 treble crochets into the same chain loop. (This is called a 'shell')

Carry on along the edge of the blanket, making 3 trebles (tr's) into each chain space until you get to the corner.

Make a further 3 tr's into the same corner space. Then carry on along the side of the blanket as before, making 3 tr's into each chain loop.

To finish the round, make a slip stitch into the 3rd chain of the beginning of the round (shown by my hook in the picture on the left).

Attach a new colour yarn in between the sets of 3tr's (in between 2 Shells') of the round below. (see pic on the left to indicate where to attach yarn)
Chain 1 and make a dc into the same place.
Chain 2 and then skipping the next 3 treble stitches (or 'Shell), make a dc. (see pic on the right)

Chain 2 and make a dc into the corner space. Chain 2 again.

Carry on all the way round the blanket, working the edges and corners as described, until you get back around to the beginning. Then make a slip stitch into the 1st dc of the round.


Then, keeping the same yarn colour, start working as per ROUND SIX along the edge, except make 3 chains between each dc, instead of 2.
When you reach the corner, chain 3 and make a dc into the corner space as usual to start.

Chain 3 and instead of making another dc into the corner space as usual, this time, just continue round the blanket, making your next dc between the first and second shell of the new round.
(See pic on the right)
Carry on right around your blanket in this way and to finish, make a slip stitch into the 1st dc of the round.

There you have it, one very colourful, super granny-ish, Giant Patches Blanket Border.
COLOURS:
Used in this tutorial only
(The original blanket used more colours and in a different arrangement.)
Why not come and share your creations with us in Cherry Heart's Cozy Corner, my Ravelry group. It's a great place to go if you've got any questions too!
S x
(See pic on the right)
Carry on right around your blanket in this way and to finish, make a slip stitch into the 1st dc of the round.

There you have it, one very colourful, super granny-ish, Giant Patches Blanket Border.
COLOURS:
Used in this tutorial only
(The original blanket used more colours and in a different arrangement.)
Stylecraft Special DK
Starting at the inside, next to the blanket and working out to the edge:
1. Silver - 1203
2. Storm Blue - 1722
3. Raspberry - 1023
4. Teal - 1062
5. Goldilocks in a discontinued yarn, you could use: Gold - 1709
6. Claret - 1123
Why not come and share your creations with us in Cherry Heart's Cozy Corner, my Ravelry group. It's a great place to go if you've got any questions too!
S x
♥
Thank you so much, Sandra. I was able to figure out what you did between the granny clusters, but the beginning was a problem. Now I only need to finish the last 190 squares on my blanket and then start the border. Oh, and I wanted to say that the colour combination of that test squares border is beautiful!
ReplyDeleteOoohh that looks like a lovely border! Looking forward to trying that one out - thank you for all the time & effort on such a brilliant tutorial Sandra! Have a great week, Helen
ReplyDeleteThank you thank you so much for the instructions.
ReplyDeleteirene
xxxx
Lovely - I would never have thought about the decreasing dc but it makes perfect sense. Thanks for the tutorial x Jane
ReplyDeleteThis is such a beautiful border for your granny square blanket. I'm so glad that you posted it here to share with all us crochet enthusiasts! I love this stitch which gives little points of colour between the 3 dc (shell). Finishing off something beautifully is so important, isn't it?
ReplyDeleteHave a lovely weekend! Sandra
Thank for really clear tutorial, Sandra! :) J.
ReplyDeleteThank you for the tutorial. Also from your last blogpost. I like to try that crocetflower.
ReplyDeleteHug
A fantastic tutorial. Thank you!
ReplyDeleteAnne xx
Sandra! Thank you for this fantastic tutorial. I have been trying to figure it out for a little while. Your tutorials are always great, easy and fun to follow. Can I be cheeky and ask what was the second colour you used for your border? I loved your colour combination, soooo beautiful and colourful.
ReplyDeleteThis is great my dear, thank you. I love this border xx
ReplyDeleteHello
ReplyDeleteI found your gorgeous blog via Annie at Knitsofacto and must say that i adore this border, thank you so much for sharing xox Penny
oh more 'crochet love' here! Hmmm....I'm kind of sad that I finished off my latest afghan last night (except for those pesky yarn ends *lol!* ) I think this border would have been a lovely finishing touch. Oh well! there's always next time. (and what a wonderful 'excuse' to buy some more yarn *grin* )
ReplyDeleteI like! Ana from lanas de Ana has some similar, which I've used :)
ReplyDeletejust beautiful!!!!! thank you for sharing Sandra,
ReplyDeletea big hug xxx Ale
Excellent tutorial, Sandra! This type of border has become one of my favorites for granny squares. I will pin it for future reference...
ReplyDelete♥ Ana BC
Very nice! Just started a granny patch, and this is a lovely border. Will remember to come back when I get that far!
ReplyDeletePure genuis, thank you. My next finish I will try this border.
ReplyDeleteblessings, jill
Thank you for this tutorial, it's something I will definitely have a go at, it gives a very different look to the granny. Rowen@Coastal Colours
ReplyDeleteWonderful. Thank you for sharing.
ReplyDeleteGreat tut - Mind is I share it on my FB group?
ReplyDeletewww.facebook.com/onshekel
I love the border so feel another blanket coming on to give it a try - just placed a big stylecraft order - hurry up postman x
ReplyDeleteThank you for such a great tutorial and what a great border !
ReplyDeleteThank you thank you for your tutorial, this is an absolutely gorgeous border! :-) xxxx
ReplyDeleteSo glad you put this up! I love that border.
ReplyDeleteThanks for sharing!! It's so lovely, I am definitely going to do it :)
ReplyDeleteHave a great weekend!!
Lluisa x
http://spinningyarn74.blogspot.com.es/
So beautiful! I can't wait to try it on my next blanket! Thanks for sharing! Have a great weekend! xo Heather
ReplyDeleteThanks so much :)
ReplyDeleteSandra x
wow sandra this is lovely I have to try this out. Hope all is well with you hun
ReplyDeleteHi Sandra! I'm basically just copying everything about your lovely granny patches blanket (well, in minuature anyway, haven't got the pactience to go full king sized!) and started on this border last night. The thing is, I just got to the end of round 2 and when I laid the blanket out flat to have a look, it was curling a lot at the corners and also puckering along the edges. Did this happen with yours? If so did it correct itself as you continue with the rounds? Or an I crocheting too tight do you think?
ReplyDeleteLove the look of this granny border. Great picture tutorial and I shared it on SU.
ReplyDeleteBrilliant border!!!! So pretty! Your tutorial is so clear, makes it easy to follow, thank you so much
ReplyDelete